How to use ConstraintSet
September 30, 2022
In this post, I will explain how to use ConstraintSet and why you have to do it
in this particular order. I will start with how to use it so that uninterested
readers can copy and paste and move on.
Summary
Here is how you are supposed to use ConstraintSet with ConstraintLayout.
Take note of the order of the steps.
val layout = ConstraintLayout(context)
val tv1 = TextView(context)
tv1.text = "Hello"
val tv2 = TextView(context)
tv2.text = "World"

val c = ConstraintSet()

// Prerequisite: All children views of the constraint layout must have an ID
tv1.id = View.generateViewId()
tv2.id = View.generateViewId()

// 1. Add the views to the layout
layout.addView(tv1)
layout.addView(tv2)

// 2. Clone the layout
c.clone(layout)

// 3. Create your constraints
c.connect(tv1.id, ConstraintSet.TOP, ConstraintSet.PARENT_ID, ConstraintSet.TOP)
c.connect(tv2.id, ConstraintSet.TOP, ConstraintSet.PARENT_ID, ConstraintSet.TOP)

c.connect(tv1.id, ConstraintSet.START, ConstraintSet.PARENT_ID, ConstraintSet.START)
c.connect(tv2.id, ConstraintSet.START, tv1.id, ConstraintSet.END)

// 4. Apply your constraints to the layout
c.applyTo(layout)
The result:
If you are using a ConstraintLayout from a layout resource, you can skip the
first step as the views would have already been added to your layout. Simply
follow step 2 onwards. However, you will still need to have IDs for all the
child views of the ConstraintLayout.
Behind The Scenes
We can understand how ConstraintSet by looking at the source code of the class
and we can find the source code here.
Specifically, let’s zoom in on the two methods we use: clone and applyTo.
Here is a greatly simplified and shortened implementation
    public void clone(ConstraintLayout constraintLayout) {
        int count = constraintLayout.getChildCount();
        mConstraints.clear();

        for (int i = 0; i < count; i++) {
            View view = constraintLayout.getChildAt(i);
            int id = view.getId();

            if (id == -1) {
                throw new RuntimeException("All children of ConstraintLayout must "
                        + "have ids to use ConstraintSet");
            }

            if (!mConstraints.containsKey(id)) {
                mConstraints.put(id, new Constraint());
            }
            Constraint constraint = mConstraints.get(id);
            if (constraint == null) {
                continue;
            }

            // continue to initialize constraint...
        }
    }
See the actual implementation here.
From the clone(ConstraintLayout constraintLayout) implementation, we can see
that a few key things are going on:
cloneretrieves the children in the constraint layoutcloneclears all of its current constraintscloneinitialises constraints for each child view in constraint layoutclonethrows an error if the view does not have an ID (-1means that no ID was set)
And so, this means that clone can only be called after the layout has all of
its children, because it will to initialise the constraints for all of the
child views in the layout.
applyTo itself has a short implementation:
    public void applyTo(ConstraintLayout constraintLayout) {
        applyToInternal(constraintLayout, true);
        constraintLayout.setConstraintSet(null);
        constraintLayout.requestLayout();
    }
It runs another method, applyToInternal, which somehow applies the constraints
to the constraint layout. After that requestLayout() will tell the constraint
layout to position its child views again, now with the new constraints (more
about requestLayout).
Let’s look at applyToInternal. I have greatly simplified and shortened the
implementation here again:
    void applyToInternal(ConstraintLayout constraintLayout, boolean applyPostLayout) {
        int count = constraintLayout.getChildCount();
        for (int i = 0; i < count; i++) {
            View view = constraintLayout.getChildAt(i);
            int id = view.getId();
            if (!mConstraints.containsKey(id)) {
                Log.w(TAG, "id unknown " + Debug.getName(view));
                continue;
            }

            if (id == -1) {
                throw new RuntimeException("All children of ConstraintLayout "
                        + "must have ids to use ConstraintSet");
                continue;
            }

            Constraint constraint = mConstraints.get(id);
            if (constraint == null) {
                continue;
            }

            ConstraintLayout.LayoutParams param = (ConstraintLayout.LayoutParams) view
                    .getLayoutParams();
            constraint.applyTo(param);

            // continue to set constraint properties to view...
        }
    }
Therefore, from the applyTo(ConstraintLayout constraintLayout) implementation, we can see
that:
applyToalso retrieves the children in the constraint layoutapplyToapplies the constraints stored withinConstraintSetto the viewsapplyTohelps us to re-layout the child views, so there is no need to callrequestLayoutafter we’re done.applyToalso throws an error if the view does not have an ID
What this means is that applyTo needs the views inside the constraint layout
and it also needs to know all the constraints to apply.
So, if we put together these two ideas, we can see that we need to follow this order:
- Add the views to the layout
- Run
clonewith the layout - Create constraints
- Run
applyTowith the layout
Caveats
There are a few other gotchas to take note of when using ConstraintSet.
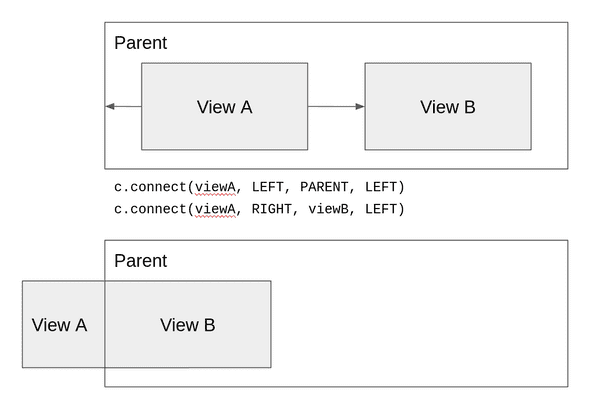
1. connect is not commutative
That is to say connect(a, LEFT, b, RIGHT) is not the same as
connect(b, RIGHT, a, LEFT). Think of constraints as hands pulling on the view.
connect(a, LEFT, b, RIGHT) means that you have a hand coming out from the left
of a and it is trying to pull the right of b towards itself.
Let’s ignore the vertical axis for now and see an example. Let’s try to put
viewA on the left of viewB and have the whole thing flush to the left of the
parent.
c.connect(viewA, LEFT, PARENT, LEFT)
c.connect(viewA, RIGHT, viewB, LEFT)
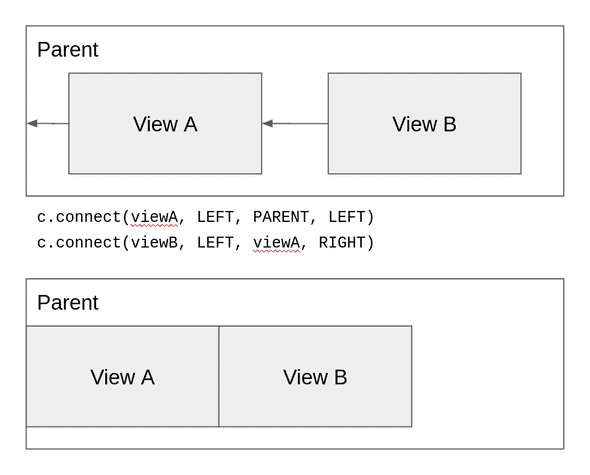
The top half of the image shows how the constrains will “pull” the view, and the bottom half shows the result.
By default, the view will be flushed to the start of the parent. So, since
viewB is unconstrained, it is positioned at the start of the parent. Then,
since viewA has two constrains, left to left of parent and right to left of
viewB, this means that viewA is positioned in the center of these two edges.
On the other hand, if we were to switch viewA and viewB:
c.connect(viewA, LEFT, PARENT, LEFT)
c.connect(viewB, LEFT, viewA, RIGHT)
Now, we can see that the viewB is being pulled towards viewA. So, when
viewA moves, viewB will move along with it. This gives us what we want.
2. All views to be constrained must have an ID
As mentioned above ConstraintSet will ignore views that do not have an ID. By
default, it will throw an error if the view has no ID, but this can be disabled
using constraintSet.setForceId(false).
Also note that you should follow the proper way to generate an ID. View.generateViewId()
for API level 17 and above and ViewCompat.generateViewId()
for API level below 17.
If you hardcode or generate 0 as an ID, it is invalid as 0 is used to
represent a non-existent resource.
Conclusion
I hope my spending of half a day trying to fix this problem won’t have to repeat for you. Now with a better understanding, perhaps you won’t have any problems with this.


